After getting the proprietary USB adaptor cable, I was able to test out the Direct Copy function.
The good news is that it works, the better news is that it works for both self-powered (using AC) HDD i.e. the 3.5" type and also USB powered HDD, i.e. the 2.5" variety. This is a big improvement over the Sanyo HD2000 where the similar function will only work with self-powered HDD and thus the much smaller USB powered HDD is ruled out. Another point to note is that the Sony camcorder must be on AC power, presumably this will avoid files lost in case it run out of power if on battery.
For my test, I used a Maxtor Basics, 640GB external HDD that is AC powered. This came preformatted in NTFS and the camcorder programme suggested to reformat the HDD to FAT32. It took about 40 seconds for the formatting.
It then asks if you want to Play or Play Without Copying.
If you access the Menu when an external HDD is connected, you'll find an item, Easy Copy under the Edit group. You will use to copy videos to the HDD. The camcorder will first calculate the necessary space for HD movie copy. In my case it took about 3 minutes since there were about 100GB of videos and then the copying starts. This took quite a while and luckily there was a progressive timeline on the camcorder that also shows the elapsed time. In my case it took about 2 hours and 15 minutes and this seems to be faster than a Windows copy that I did earlier which took about 3 hours. (Not sure of the actual timing since I just left it to run but definitely it took longer earlier.)
Three folders are created in the HDD; they are AVCHD, DCIM and PRIVATE. Photos are stored in a subfolder under DCIM and videos are stored in the subfolder STREAM under AVCHD as .mts files. This file structure is same as the one on the build-in HDD and thus you can play and manipulate them on the camcorder just like they are on the built-in HDD or SDHC card.
When the HDD is connected to a PC installed with PMB, the programme recognises it and offer to import the files over as if the camcorder is connected.
This Direct Copy function is not so useful for me since the XR350 already has a 160GB built-in HDD. For other models that uses only SDHC cards, it would be very useful when going on long holidays since you can copy your files to an external HDD without the need of a PC and freed the SDHC card for more videos. Thus you need not carry a lot of SDHC cards.
Ronald Kwok
Thursday, August 5, 2010
Thursday, July 22, 2010
Sample photos from XR350
A reader asked for some sample photos from the Sony XR350 so below are samples that I took this afternoon. Nothing spectacular, as it is normal with camcorders. Also the sky was overcast so it doesn't help.
This one is taken at wide angle.

The same scene taken at mid-zoom or thereabouts.

This is taken at full zoom.

My hobby is macro photos so I just cannot resist when this moth came around. This is taken with normal macro at wide angle.

And this is taken at zoom macro, i.e. at full zoom so it may have fallen outside the focus range.

The original photos were taken at 5.3M size but reduced to 2M for uploading in Blogger. Only the iAuto (full auto) mode was used in all the photos.
I use the XR350 primarily for videos and if I need photos, I'll just capture them from the videos. Below are some examples of photos that were extracted from the videos using the supplied software, Picture Motion Browser (PMB). These are the better examples as the quality will depend on minimal motion in the videos.
.jpg)
.jpg)
.jpg)
.jpg)
All the photos are unedited and taken straight from the videos. Don't think they will win any prizes but good for the memories, though. Cheers
Ronald Kwok
.jpg)
.jpg)
.jpg)
.jpg)
All the photos are unedited and taken straight from the videos. Don't think they will win any prizes but good for the memories, though. Cheers
Ronald Kwok
Friday, July 9, 2010
Points to note for new owners of Sony 350
After using the XR350 for a month or so, there are a few pointers that may be useful for new owners.
Video Resolution
The default resolution is HD HQ with a bit rate of only 9Mbps so you need to manually change it to a higher resolution if so desired. But note that the highest resolution of HD FX is at 24Mbps and if this is selected, there is a message to say that you cannot copy video to an AVCHD disc and you cannot take still shots while taking movie at this resolution. To avoid these issues, use the HD FH mode at 17Mbps which is good enough for normal usage. All HD modes are presumably at 1920x1080i.
iAuto Mode
After making some changes in the menu, the iAuto icon disappeared and I tried desperately to search in the menu to turn it back on but to no avail. The only way you can do it is to press the iAuto button on the side of the camcorder below the green iAuto icon; and this is not even mentioned in the manual at all! The first thing you should do is to turn on iAuto if the screen does not show this and this is the best mode for shooting videos for new owners before you venture into the other manual modes. Almost all my videos during my holiday in Germany are shot using just the iAuto mode and seems to work well. You can see these videos in my Germany travel blog and on Youtube and more videos are added progressively.
Recording Status
It is very easy to turn the Recording button on and off especially if you rest your thumb on the right side of the battery where the Rec button is located. Many a times I found that I have made recordings while holding the camcorder so what is filmed is just the ground. Also sometimes I could not find a clip that I thought I have recorded since I have accidentally turned the camcorder off as soon as I turned it on or did not press it hard enough to turn it on. The best is to check the screen for the recording status (REC/STBY) but this can be hard to see under bright sunlight outdoor. You can also use the Record button on the touch screen of the LCD.
Length of Clip
There is no information on the length of a video clip from the playback menu. You can see this in a roundabout way. Select Photo Capture on the Edit menu and when you play the clip, there is a moving time-line with the length of the clip shown on the right. On the Visual Index screen you can see the total length of all the videos for a particular date but I think this is not very useful, for me anyway. It is more useful to have the length of each individual video for purpose of editing. You can choose to show the date and the time when the video is shot as one of the data options.
File Copy
After connecting the USB cable to the PC, the USB Select screen will appear and you can connect either the internal memory, the internal hard disk or the memory card depending on the model of your 350 and what is available. The PMB Import screen will appear (if you have installed the PMB software) and you can follow the instructions on the screen to import the files to your PC. If you do not want to use the PMB software, bypass the Import screen and go to My Computer and you should see the camcorder as an external media device. You can then just go into the external media device and drag and drop the video files that you want to copy. These are the files with mts file extension such as 00123.mts and the other files are not necessary for playback.
HDMI Cable
To watch video on your HDTV, you must have the mini HDMI cable which is not supplied with the camcorder. Thank goodness the mini HDMI cable is not proprietary as I was able to view the videos on my HDTV by buying a generic mini HDMI cable that costs only 1/8 the price of the Sony cable. However, you have to get the Sony USB adaptor cable if you want to use the Direct Copy function as a generic one will not work.
Hope these hints will be of help to new users and I'll be happy to answer any other queries that users may have, if I can.
Ronald Kwok
Wednesday, July 7, 2010
More clips showing Sony OIS
Unable to find a clip taken while walking and zooming the same time, not yet. I believe it is there somewhere but with 100GB of videos it'll take some time to go through them all. Anyway, here is one taken on the tour bus when doing the Rhine Valley. It is taken through the bus window so there is some reflection and an overall green tinge. Also you can see how the auto-focus worked and under very fast changing lighting condition as the trees zoomed past. Also zooming on the castle near the beginning. It think the camcorder did pretty well and gives the visual sense of going on the tour again.
The next clip is taken on the cruise on the Rhine River itself as we neared the Loreley rock. Note the very high wind noise as it was quite windy at that time. Not sure if lowering the mic level would help as there is no wind noise reduction setting available.
Enjoy.
Ronald Kwok
The next clip is taken on the cruise on the Rhine River itself as we neared the Loreley rock. Note the very high wind noise as it was quite windy at that time. Not sure if lowering the mic level would help as there is no wind noise reduction setting available.
Enjoy.
Ronald Kwok
Sunday, July 4, 2010
Sony Image Stabilisation
The main reason I moved from a the Sanyo HD2000 to the Sony XR350E is to see how much better the Optical Image Stabilisation is in the Sony compared to the Sanyo. I suppose the IS in the Sanyo is almost non-existent so any other camcorder would be better. What more, the new Sony range claims to have the latest Optical Steadyshot Active Mode that is supposed to be better than their previous models. This will reduce shakes even when walking and zooming the same time. How does it fare in real life?
Well below is a short clip taken in Hamelin during my holiday in Germany. This was taken using one hand holding the camcorder above the head while walking and moving later down to eye-level. It sure beats the Sanyo hands down.
What about stabilisation at full zoom? Below is a clip of a bird feeding at some flowers taken at full zoom in the field outside my house. This time I think I used two hands and the stabilisation is great even at full zoom.
The lighting and thus the colour isn't that good (as compared to the above video) since I was shooting at the bright sky and the plant is in the shade. You'll see purple fringing on the leaves as well which is pretty common for lens at full zoom. You can also hear dog barking as the mic is quite sensitive and I did not set the mic to zoom mode. Sony should make this a default setting. To get a slow smooth zoom, you should use the button on the touch screen; if you use the toggle switch on the camcorder body, it may be jerky depending on how hard you press the button.
Just note that this optical steadyshot active mode is only available in the 350 and 550 ranges as the 150 range uses not optical but electronic image stabilisation but is still better than the Sanyo from what I have seen on Youtube.
I will check later if I can find a clip that is shot while walking and zooming at the same time but in any case, the OIS works.
Ronald Kwok.
Saturday, July 3, 2010
Using Direct Copy
The Direct Copy is new in this year's Sony range of camcorder. What it does is that it will transfer the files (videos and photos) from the camcorder to an external hard disk drive (HDD) directly without using a PC. Actually the Sanyo Xacti camcorders (including the HD2000 and FH1) already had something similar last year so Sony is not the first. But Sony is the first among the big three as Canon and Panasonic have not introduced this feature so far in their range this year. For Panasonic, this is surprising since they have already acquired Sanyo and are already using the 60p resolution in their top range of 700 series camcorders. Actually in my case since I have the XR350 with a built-in 160GB HDD, the Direct Copy is not so useful. This is more for the CX 300 and CX350 with small capacity of internal memory.
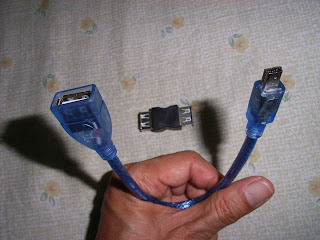
Since I wanted to test the Direct Copy function in the Sony and the USB adaptor cable is not provided, I went to Low Yat Plaza and bought the generic cable (the USB AF to 5 pin, F is for Female) to do the connection. But alas, when I hooked up the XR350 to my external HDD, nothing happened. I then checked in the AFS Forum and found that you need to get the original VMC-UAM1 cable from Sony as they must have wired the port differently from the normal. I thought I have escaped from the proprietary memory stick of the Sony but now I still need to get another Sony proprietary item, what a shame.
Not accepting defeat, I thought I can out-smart Sony. Since the same 5-pin port is used for connecting the camcorder to a PC with the USB cable that came with the camcorder, I can use this cable and use a AF-AF converter to connect to the external HDD. Thus I went and bought this converter and did the connection. Again, nothing happened and it looks like I have no choice but to get the cable from Sony. Before doing that, has any owner of this Sony range found another solution to connect an external HDD, other than using the proprietary Sony cable? Please share in the comments and help all the poor souls out there and not make Sony rich.
Below are shots of the cables I tried so it will be clearer.

You may want to try your luck but I think Sony will win. Sigh.
Since I wanted to test the Direct Copy function in the Sony and the USB adaptor cable is not provided, I went to Low Yat Plaza and bought the generic cable (the USB AF to 5 pin, F is for Female) to do the connection. But alas, when I hooked up the XR350 to my external HDD, nothing happened. I then checked in the AFS Forum and found that you need to get the original VMC-UAM1 cable from Sony as they must have wired the port differently from the normal. I thought I have escaped from the proprietary memory stick of the Sony but now I still need to get another Sony proprietary item, what a shame.
Not accepting defeat, I thought I can out-smart Sony. Since the same 5-pin port is used for connecting the camcorder to a PC with the USB cable that came with the camcorder, I can use this cable and use a AF-AF converter to connect to the external HDD. Thus I went and bought this converter and did the connection. Again, nothing happened and it looks like I have no choice but to get the cable from Sony. Before doing that, has any owner of this Sony range found another solution to connect an external HDD, other than using the proprietary Sony cable? Please share in the comments and help all the poor souls out there and not make Sony rich.
Below are shots of the cables I tried so it will be clearer.


You may want to try your luck but I think Sony will win. Sigh.
From reading the manual and the AFS Forum, this Direct Copy is an improvement over the Sanyo. In the Sanyo, you must use a self-powered HDD meaning you must use the bigger 3.5" HDD while in the Sony you can also use the much smaller USB-powered 2.5" HDD. This is more convenient in terms of portability. I can only tell you more about the Direct Copy after getting the Sony cable. So hang on there.
Ronald Kwok
Ronald Kwok
Sony
Meanwhile I had great difficulty uploading a 1-minute Sony video in Youtube. Tried several times but it aborted before reaching 100% and the last time at 97%, what frustration! So I trim one to about 25 seconds and this time it uploaded. Here it is.
This clip was taken in Hamelin, the Pied Piper town in Germany. It was shot with one hand while walking and you can see that the image stabilisation is very effective. It cope pretty well with the lighting with both bright and shade areas together. Will upload more later, now time to watch the World Cup match. Cheers.
This clip was taken in Hamelin, the Pied Piper town in Germany. It was shot with one hand while walking and you can see that the image stabilisation is very effective. It cope pretty well with the lighting with both bright and shade areas together. Will upload more later, now time to watch the World Cup match. Cheers.
Thursday, June 24, 2010
Something missing from Sony
OK, folks, I am now back from my holidays in Germany with my wife and the Sony XR350E camcorder. All of us survived the trip and the built-in 160GB HDD is just great for travelling. I shot almost 100GB of videos, mostly short clips and some of them trash, of course. But hey, when you do not have to worry about running out of storage space, you tend to be trigger happy.
I just managed to sort out my videos under the various places that I visited and only when I wanted to do some basic editing that I realised an important feature (to me at least) is missing from the Sony. I was so used to cutting and joining my video clips with the Sanyo HD2000, just using the camcorder itself without having to open an external editor and I expected to be able to do the same with the Sony. The Cut (or Divide function as the Sony calls it) is there but there is no Join function built into the camcorder. I could not find this Join function even in the included editing software, PMB (Picture Motion Browser) so I was rather disappointed. Another useful information shown for each clip in the Sanyo is the length of the clip and surprisingly this is not shown in the Sony and you need to do it in a roundabout way to get this information.
Another feature that is less user friendly than the Sanyo is extracting photos from videos. In the Sanyo, you pause the video and select the frame you want to capture as a photo and just press the photo button. In the Sony, this function is included under the Edit menu and is thus not so readily available. This function is also available in the PMB software though. BTW, while the video is paused, you can zoom in with the Sanyo to check on the details but not in the case of the Sony.
I will give more details on the differences between the two in my later posts but definitely the Sony is superior in the image stabilisation and the auto-focus. To my eyes, I find the colour in the Sanyo more vibrant and more saturated while the Sony is subdued but more natural which will please the purist but many may prefer larger-than-life colours, especially to show off your new HDTV. Anyway, colour preference is usually a personal matter so this depends on individual tastes and each camera make will have its own colour characteristics. However, there are no settings in the Sony to change the image properties and at this price, this is surprising. There is a normal and vivid colour mode in the Sanyo but I don't see much difference between the two. The wider angle of the Sony lens is also useful for taking in the landscapes and buildings without panning.
(Maybe I am still new with the Sony and do not know where to look for the above features but I checked through the menus and cannot find them anywhere so perhaps more experienced users of the Sony may want to comment here.)
I wanted to test the Direct Copy function of the Sony but the USB adaptor cable is not included so I need to get one elsewhere and I could not connect directly to my HDTV from the HDMI port of the Sony since it uses the mini HDMI cable (not included) and not the standard size cable. On the other hand , the Sanyo uses the standard HDMI cable and the USB adaptor for connecting to an external HDD is provided but is different from the one required by the Sony so I'll end up with more cables! Sigh.
This is just to whet your appetite and I will post some videos from both the Sony and the Sanyo later after doing some editing to show their differences and similarities.
Ronald Kwok
Monday, May 31, 2010
First impression of Sony XR350E
Ever since I bought for my wife the Sanyo HD2000 camcorder, I was smitten by the video bug. As I used the HD2000 more and more, I became less satisfied and wanted something better especially after taking some videos for my church functions. The major disadvantage of the Sanyo HD2000 is of course the poor image stabilisation and the shifting of focus when lighting changes. Thus I began looking for an alternative. I bumped into a Sony Store one day and tried out the latest range of Sony camcorders. I expected the new range to cost higher than the previous range because of many new features and was surprised that they are actually cheaper than last year's models considering the extra features.
I was considering the 150, 350 and 550 series. The 150's were ruled out because they do not have optical image stabilisation and thus may not be much better than the HD2000. The 550's was not considered because of the bulk and I do not need the extra features that came with additional cost. I focused on the 350 range as the price seems to offer the best value for money.
Next to consider was which model in the 350 range. The flash memory or the HDD version? After having gone through the hassle of carrying an external HDD with my HD2000 in my trip to Turkey the last year using the direct transfer to HDD function, I opted for the XR350E that has an internal 160GB HDD as I will be going on a 14 days trip to Germany. (In fact will be leaving tomorrow!) Thus I ended with the Sony HDR-XR350E, to give its full name.
I did not have much time to play with it since I was very busy with a fund raising project for my church. But briefly, below are my first impressions, compared with the Sanyo HD2000.
*Image stabilisation - Sony wins hands down. It is rock steady at normal use and very stable even while walking and also at full zoom.
*Auto focus - Sony wins again, it is faster and does not shifts like in the Sanyo.
*Handling - I find the Sanyo easier to handle with the pistol grip maybe because I am used to it. The Sanyo is both smaller and lighter.
*Menu - The Sanyo's menu is more intuitive and more user friendly and I can reach what I want most of the time without referring to the manual. The Sony menu is more puzzling and even the manual itself is not very clear. Again this may be I have been using the Sanyo for a longer period of time.
*Manual - the Sanyo is again more user friendly. The Sony refers you to another Handbook for more information but it contains a lot of duplicated information from the manual. Might just as well have one combined use manual.
*Lens - Sony G lens is very sharp even at full zoom and it is wide-angled, Sony wins.
*Video quality - Sanyo has 1080p while Sony only 1080i but cannot see the difference on a HDTV. For normal shooting both are adequate unless one does a side by side comparison. The Sony also has less lens flare compared to the Sanyo (from my shooting thus far.)
*Editing - the Sanyo has very simple to use built-in basic editing functions; Sony's are hidden and yet to tried out. Sanyo seems to have more useful visible video information like length of each video clip.
*Connection - The Sanyo uses a normal HDMI cable while Sony needs the mini HDMI version which is more costly and harder to find.
*Media - The Sony at last can take the SDHC card. Previously, I never considers a Sony since it takes only the Sony memory stick.
*Built-in mic - Sanyo seems to sound better but this is not really a side by side test.
*Interface - Sony uses the more trendy touch-screen while Sanyo the more traditional buttons and navigational keys which at times are more positive.
The Sony seems to have more auto features while the Sanyo has more manual settings but I did not have time to test them all but Sanyo appears to be more user-friendly for first time users. I will be using my Sony XR350 while my wife will be using her Sanyo HD2000 on our trip to Germany so when we are back, I will be giving a full shoot-out report later in June. So stay tuned.
Ronald Kwok.
Subscribe to:
Posts (Atom)


